

Countronics
- Home
- Companies
- Countronics
- Products
- Countronics - Model 1050D - ...
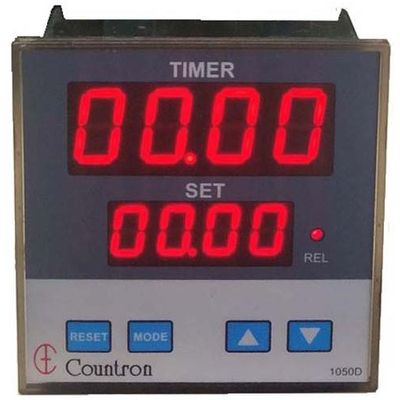
Countronics - Model 1050D -Microprocessor Based Timer
FromCountronics
6 different timing ranges of 99.99sec, 999.9sec, 9999sec,99Mins59Secs, 9999Mins, 99Hrs59Mins. Press to start/Power On start/Cyclic modes settable. Delayed On/Off programmable by user from front panel. Up/Down time counting user settable. User settable starting On/Off time for cyclic mode. Number of cycles settable for cyclic mode. Non-volatile memory to save configuration and timing. Configuration lockable by Password. Front Reset/Start switch with parallel terminals at rear. Aesthetically designed panel with membrane switches.
Most popular related searches
- Display:
- 4 Digit 0.8” Red 7 segment LED display for Time
- 4 Digit 0.56” Red 7 segment LED display for Set Time
- Red LED to indicate current status of Relay On/Off
- Modes:
- User settable from front panel
- 1. Power On start
- 2. Press to start (with battery backup selection using EEPROM)
- 3. Cyclic action
- Number of Cycles: 1-199 cycles settable for cyclic mode after which the timer stops Setting number of cycles to Zero disables number of cycles setting
- Reset/Start: Front Reset/Start switch with parallel terminals at rear to connect additional switch, if required.
- Relay logic: Settable delayed On/Off, 5 Amps/220V AC Dual Relay Contact outputs
- Timing direction: Up/Down time counting user settable
- Memory: Non-volatile EEPROM to save settings
- Configuration Lock: Open terminals 1&2 to lock all configuration except Set Limits
- Supply: 220V AC ± 15% @ 50/60Hz
- Dimensions: Front Fascia: 96mm x 96mm x 50mm. Cut Out: 91mm x 91mm
- Weight: 800 grams
- The panel cut out of 92mm x 92mm is required. The instrument is pushed in from the front and held tightly in the panel by screwing the two side clamps from the rear.
- To wire the equipment, refer to the pin-connections label on the top of the instrument or as detailed previously.
- Connect 220V AC mains to Pins as per rear label. Connect Earth terminal Pin 12 to Mains Earth. As this is a micro-controller based equipment, it is advisable to connect the Earth.
- If a separate Reset/Start switch needs to be wired, connect it across Pins marked as Reset .