

- Home
- Companies
- Nixalite of America Inc.
- Products
- Pest Armor - Model RAML350 - Solar ...
Pest Armor - Model RAML350 -Solar Panel Exclusion Mesh
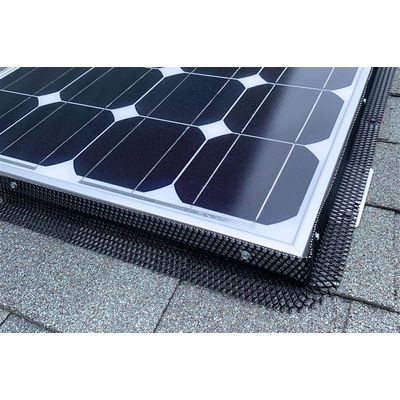
Pest Armor Solar Panel Exclusion Mesh for protection from rodents, birds, squirrels and other small critters. Pest Armor’s NEW architectural steel exclusion mesh offers tremendous versatility when faced with unique exclusion challenges. Pest Armor is a perfect exclusion solution for skylights, solar panels, roof vents, soffit and siding gaps, and much more! The ¼” woven mesh will also exclude stinging insects and stinkbugs.
Pest Armor 48” lengths are easy-to-handle and ship. Black Hex Head Screws and Sealing Washers are Included. See the accessory list for more installation clip options.
Available in a durable black powder coat finish, Pest Armor is packaged in 48" lengths totaling 80 linear feet/box. Made in the USA, these easy-to-install architectural mesh profiles provide a clean, professional exclusion solution!
PEST ARMOR SOLAR PANEL EXCLUSION
1/4″ Woven L-Mesh / RAML350
Specifications
- ¼” Expanded Mesh
- Excludes Rodents, Birds, Squirrels, Stinkbugs and Stinging Insects
- Available in 48” long Easy-to-Handle Strips
- 80 Feet Per Box (20 - 4` Strips)
- Clean and Professional Appearance
- Black Hex Head Screws and Sealing Washers Included
- Durable Black Powder Coat Finish
- Easily Painted to Match any Exterior Color
- 7-Year Limited Warranty
- Made In The USA
INSTALLING PEST ARMOR™ ON OFFSET SURFACES
Lay out sections of Pest Armor along the offset surface.
Install each section of Pest Armor by applying downward pressure to the bottom tab, while pushing up towards the second surface. Secure the bottom tab every 12”, using neoprene-washered screws (included), keeping the Pest Armor tight to both surfaces.
Overlap all seams 1”. Paint all edges cut during installation to seal Pest Armor™, protecting it from rust and corrosion.
TURNING PEST ARMOR™ 90° ON OFFSET SURFACES
At the point of your desired 90° turn, make 1 relief cut on the top tab of your Pest Armor. Bend the Pest Armor 90° to meet the offset surface.
- Flatten and secure the top tab as needed. Secure the bottom tab every 12” using neoprene-washered screws (included).
- If necessary, add relief cuts to the bottom and middle tab to allow Pest Armor to flex for compounding angles (such as a roof ridge vent end cap). Start in the middle of the end cap for the first relief cut and then add one relief cut on each side, approximately 1” from the center cut. Add more cuts as necessary. Paint all edges cut during installation to seal the Pest Armor™.